Java
The Java implementation for the Worldpay Within IoT payment SDK. This SDK enables smart devices to discover each other, negotiate a price for services, make a payment (through Worldpay) for services, and then consume services via a trusted trigger. For an overview, see Home.
You can find the Java SDK here.
Prerequisites
Before you get started:
- Install Java JDK 1.8 on your systems.
- Set the
JAVA_HOMEvariable and make sure it points to your JDK installation directory. - If you do not have it, install git.
- Install Apache Maven and add it to PATH.
- Create an account with Worldpay Online so that you can generate your own test API key. You'll replace the Worldpay test keys with your own in the SDK.
Warning
Make sure you only use test API keys.
Get started
- Clone the repository:
git clone https://github.com/WPTechInnovation/wpw-sdk-java.git - Change directory:
cd wpw-sdk-java - Run
git submodule update --init --recursive - Then build it with maven using the default goal:
mvn
Run the examples
You can try the examples by running them in two different console windows. Or, if you're installing on two separate devices, they must be one the same network that allows UDP broadcast traffic. Examples included in the repo are the sample projects: sample-consumer, sample-producer and sample-producer-callbacks. To run them you need to:
- In the first window, run the consumer JAR.
cd sample-producer-callbacksjava -jar target/sample-producer-callbacks-<version>-alpha.jar
- Simultaneously run the producer JAR.
cd sample-consumerjava -jar target/sample-consumer-<version>-alpha.jar
- The two smart devices should communicate with each other and make a payment.
The car-example and car-charger are Spring boot projects that start a webservice on localhost:80 and localhost:8000. Those ports should be free if you want to run them. To run these examples you need to:
- In the first window, run the car-example.
cd car-examplejava -jar ./target/car-example-<version>-alpha.jar
- Simultaneously run the car-charger.
cd sample-consumerjava -jar ./target/car-charger-<version>-alpha.jar
- In your browser, navigate to
localhost:8000, open SmartCar UI page in one tab and Producer UI page. Set the battery level by touching the green bar and begin charging by pressing the "Charge the battery" button.
Creating your own keys
You can do this whenever you want, but you're going to need to create your own API keys. These keys allow you to simulate payments and see the outcome, rather than just using the keys Worldpay included in their SDKs.
Warning
Make sure you only use test keys.
To add your own test API keys:
- Login to Worldpay Online.
- Go to Settings.
- Then click API Keys.
- Grab your Service key and Client key. They'll look something like this:
T_S_fd00db67-b77b-4d6e-1a2a-45f65123f795. - Find the config folder of the SDK and find the producer JSON files.
- Add your Service and Client keys:
- The
pspConfig.merchant_client_keyandpspConfig.hte_public_keymust have the same key. - The
pspConfig.merchant_service_keyandpspConfig.hte_private_keymust have the same keys.
- The
- Save your work.
Once you've added your own test keys, you'll be able to start testing your payments.
Seeing your payments
Now that you've added your own test keys to the producer config files, you can start testing your payments. Refer to the Run the examples topic for more information about this.
To see your test payments:
- Login to Worldpay Online.
- On the homepage, scroll down to the Recent Orders section.
- Your payments are here. You'll be able to see:
- Order Code - The order code
- Customer Order Code - The customer's order code
- Gross Amount - The gross amount of the order
- State - The state of the order. For example, SUCCESS or AUTHORIZED
- Payment type - The type of payment. For example, ECOM
- Order type - The type of order. For example, VISA_CREDIT or VISA_DEBIT
- Updated - The last time the payment state changed
For more information, refer to the Worldpay Online documentation.
Debugging
If you're having trouble, you can contact us at Innovation@Worldpay.com. Alternatively, you can raise an issue in GitHub.
So what's happening?
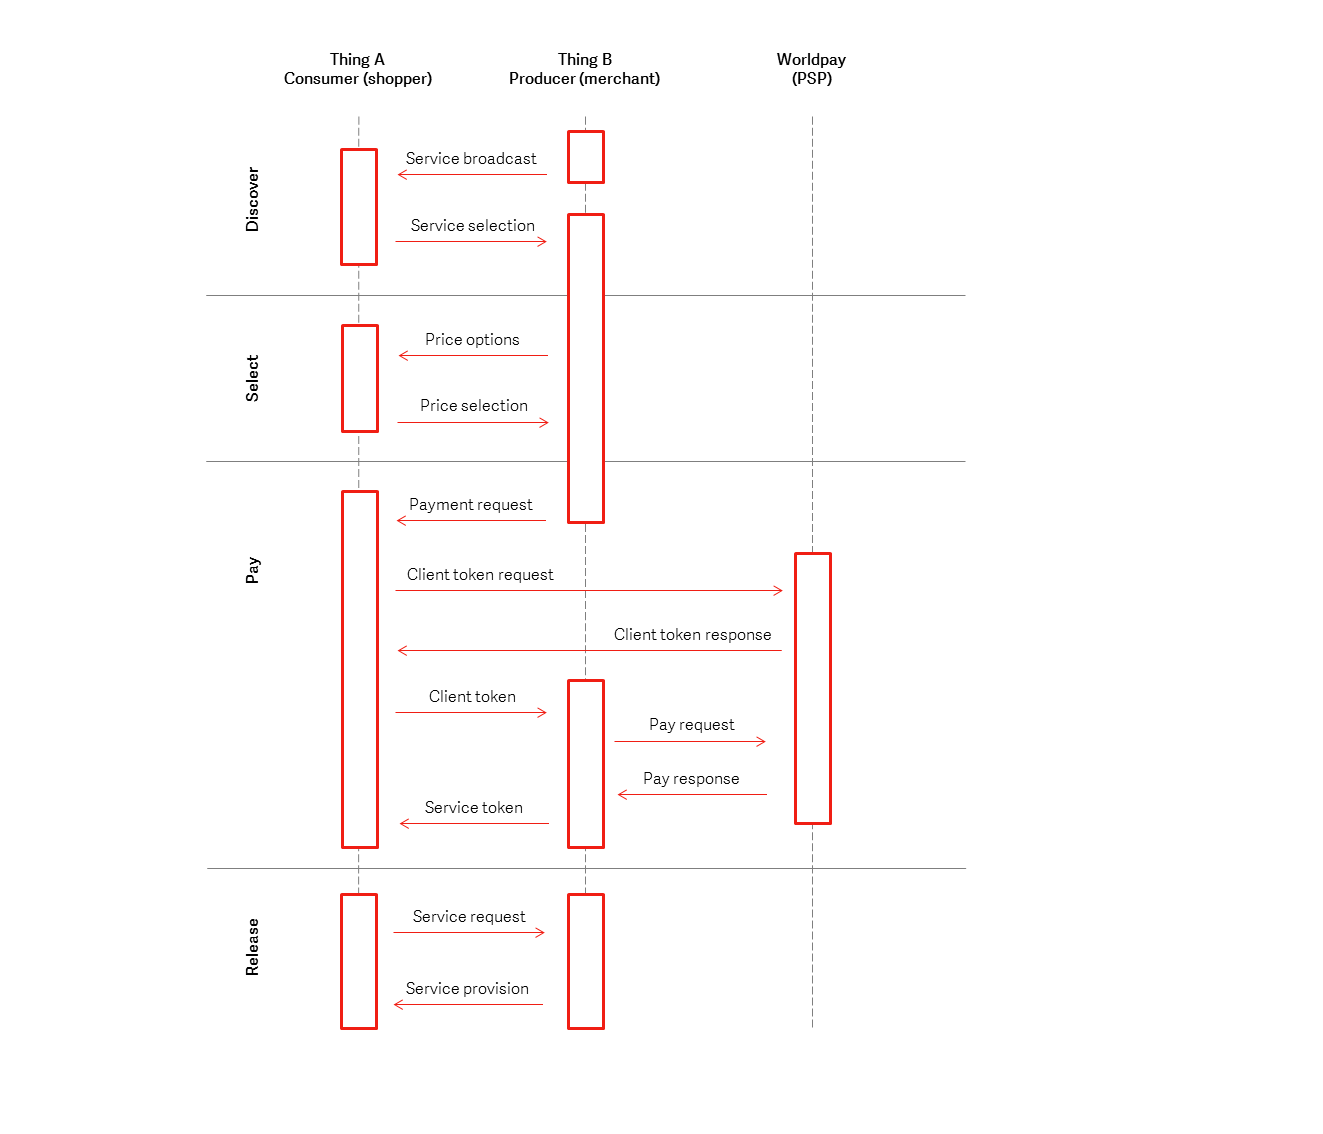
You can see there are four phases; Discover, Select, Pay, and Release. For more information, see Home.
What IoT devices can I run this on?
Note
The devices need to be on the same network - and that network should allow for UDP broadcast traffic. Most mobile hotspots allow this; a lot of corporate networks do not...
Want to contribute?
If you want to contribute, clone the repository and create a branch. Once you've made your changes, create a pull request. We'll review your code, and if accepted it will be merged into the code base. It's worth checking out the Internal Structure of Worldpay Within and Sample Service Messaging pages if you want to learn more about how Worldpay Within works.
You can also raise an issue in GitHub, or contact us directly at Innovation@Worldpay.com.