.NET
The .NET implementation for the Worldpay Within IoT payment SDK. This SDK, or Software Development Kit, enables smart devices to discover each other, negogiate a price for services, make a payment (through the Worldpay Online Payment gateway) for services, and then consume services via a trusted trigger. For an overview, see Home.
You can find the .NET repository here.
Prerequisites
Before you get started:
- Install the Visual Studio 2017 (any edition) on your system. We've tested this wrapper with Visual 2017 Community Edition .NET (4.5+).
- If you do not have it, install git.
- Create an account with Worldpay Online so that you can generate your own test API key. You'll replace the Worldpay test keys with your own in the SDK.
Warning
Make sure you only use test API keys.
Get Started
The .NET Worldpay Within SDK provides a convenient entry point for application developers who wish to create applications using the Worldpay Within SDK.
Currently, there are no NuGet published libraries for the SDK. This issue is being tracked in Issue #1 on GitHub.
For now you'll need to build the project yourself, by following these steps:
- Clone or download the repository by typing
git clone https://github.com/WPTechInnovation/wpw-sdk-dotnet.gitin a terminal or console. See the project homepage on GitHub for more options. - Change directory:
cd wpw-sdk-dotnet - Update the submodules:
git submodule update --init --recursive - Open the Worldpay.Within.sln project in Visual Studio 2017.
Run the examples
Once you've loaded the projects in Visual Studio and built the project successfully (please note you can report any problems or errors to us on Github), you're good to begin testing.
To run a sample app, run the Worldpay.Within.Sample project.
We'd recommend using your own test API keys for this. We've left ours in the code, so that it "just works", but you won't be able to see the payments with our keys unless you change them. For more information, refer to Creating your own keys below.
The sample application is a Windows console application. To make a simple payment, do the following:
- Select option 1 Start Simple Producer. This will start a local RPC Agent and register a separate producer with it. Ths producer has a very simple service declaration.
- Select option 3 Consume Purchase. This will start another RPC Agent and attempt to consume the first product of the first service it finds on the network (This will most likely be your producer).
The sample application produces lots of logging; you can control this by editing the App.config file in the root of the sample project directory.
Creating your own keys
You can do this whenever you want, but you're going to need to create your own API keys. These keys allow you to simulate payments and see the outcome, rather than just using the keys Worldpay included in their SDKs.
Warning
Make sure you only use test keys.
To add your own test API keys:
- Login to Worldpay Online.
- Go to Settings.
- Then click API Keys.
- Grab your Service key and Client key. They'll look something like this:
T_S_fd00db67-b77b-4d6e-1a2a-45f65123f795. - Find the config folder of the SDK and find the producer JSON files.
- Add your Service and Client keys:
- The
pspConfig.merchant_client_keyandpspConfig.hte_public_keymust have the same key. - The
pspConfig.merchant_service_keyandpspConfig.hte_private_keymust have the same keys.
- The
- Save your work.
Once you've added your own test keys, you'll be able to start testing your payments.
Seeing your payments
Now that you've added your own test keys to the producer config files, you can start testing your payments. Refer to the Run the examples topic for more information about this.
To see your test payments:
- Login to Worldpay Online.
- On the homepage, scroll down to the Recent Orders section.
- Your payments are here. You'll be able to see:
- Order Code - The order code
- Customer Order Code - The customer's order code
- Gross Amount - The gross amount of the order
- State - The state of the order. For example, SUCCESS or AUTHORIZED
- Payment type - The type of payment. For example, ECOM
- Order type - The type of order. For example, VISA_CREDIT or VISA_DEBIT
- Updated - The last time the payment state changed
For more information, refer to the Worldpay Online documentation.
So what's happening?
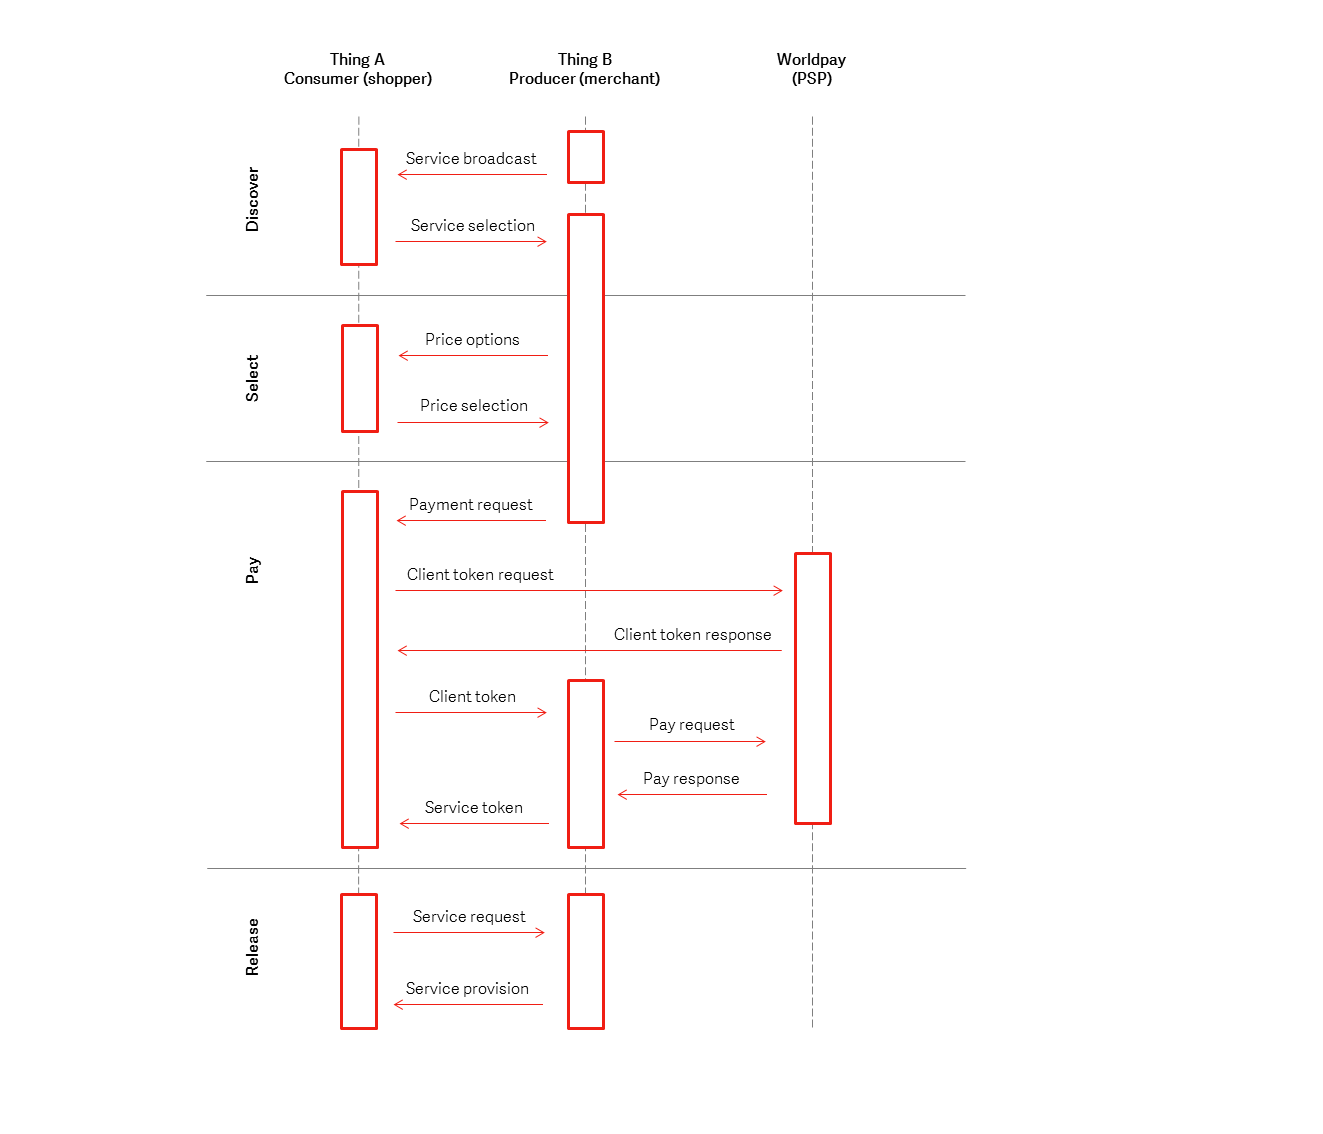
You can see there are four phases; Discover, Select, Pay, and Release. For more information, see Home.
Introduction to the different .NET projects
Worldpay.Within
This is the main .NET wrapper entry point assembly. The public API is contained inside the Worldpay.Within package.
You can use Sandcastle to build the docs, however they will be published online at some point (see Issue 2).
Worldpay.Within.Rpc
This project contains nothing but the generated RPC wrappers for Thrift; you never edit code in here. This is a separate project because the style and organisation of the code generated by the Thrift compiler is pretty poor; this approach isolates this to a single project.
To rebuild the code, first delete all the existing source files and their directories. This clears out any existing code that may have been moved or removed in a new version. Then run the Thrift compiler:
thrift-0.10.0.exe -r -out %GOPATH%\src\innovation.worldpay.com\worldpay-within-sdk\wrappers\dotnet\Worldpay.Within\Worldpay.Within.Rpc --gen csharp:nullable,union %GOPATH%\src\innovation.worldpay.com\worldpay-within-sdk\rpc\wpwithin.thrift
The
-ris there just for safety, in case subdirectories are used in future for storing dependent Thrift IDL files.
Be aware that the above paths assume that you have downloaded the Worldpay Within main SDK project in to a regular "Go" development structure. However, only the thrift interface files are actually required. You can grab those directly from here. You need two files: wptypes.thrift and wpwithin.thrift - both files must be in the same directory. They are not included within the .NET repository because they are centrally maintained and used to generate multiple language wrappers.
Be sure to refresh the project source tree in Visual Studio to ensure that any newly generated files are included in the project. If you fail to do this, expect compile errors for missing types to be thrown.
Using in your own applications
To use Worldpay Within, add the following DLLs to your project path:
- Worldpay.Within.dll - this contains the SDK code and public entry points.
- Worldpay.Within.Rpc.dll - the Thrift compiler-generated code to bridge to the core Go SDK.
- Thrift.dll - Apache Thrift library.
- Logging Framework - whatever logging framework we're going to use.
To run a Worldpay Within application, the Thrift RPC code will need to be able to talk to an RPC Agent. The RPC Agent is a standalone application that manages the communication with remote third parties (for example, if you are creating a Consumer then the SDK code communicates with a local RPC Agent using the Thrift protocol, which then talks via HTTP to a remote RPC Agent, which then talks to a local Producer via the Thrift protocol).
Want to contribute?
If you want to contribute, clone the repository and create a branch. Once you've made your changes, create a pull request. We'll review your code, and if accepted it will be merged into the code base. It's worth checking out the Internal Structure of Worldpay Within and Sample Service Messaging pages if you want to learn more about how Worldpay Within works.
You can also raise an issue in GitHub, or contact us directly at Innovation@Worldpay.com.